Friday, July 30, 2010

Traverse City Inspired Cookies


Anyone and everyone who knows me knows one things: I LOOOOOVE COOKIES!!! Russian tea cookies, oatmeal cranberry cookies, chocolate chip cookies...yum yum.

So the other night I got a craving - a cookie craving. But this time, I wanted to make something a little extra special. So I went to the cupboard and found the perfect extra ingredient: Traverse City Dried Cherries. I just chopped up about a 3/4 cup and threw them into a chocolate chip cookie batter. The little pieces peeking out of the batter crisped up a little and were so tasty. I use Ghiradelli 60% bittersweet chips because I love that they are a little bigger than the normal size chip and the chocolate has a deeper chocolate flavor and are less "sugery."
My favorite part of making cookies is the beautiful color of sugar and butter mixed together in perfect harmony. My second favorite part is adding the dry ingredients to the wet and watching the delicious dough form for real. Then...it's NIBBLING time!


These cookies are the perfect pair to an ice cold glass of milk. Although I must admit...I am a sucker for cookie dough over the actual baked cookie. So I am usually a little ill by the time it comes to the dipping part...hehe :)

Tuesday, July 27, 2010

30 Minute Dinner Party


I absolutely loooove having friends over for dinner. But I have to admit, when a fellow foodie is on the guest list, I do feel the need to make something a little extra tasty. People say you should never try a new recipe at a dinner party, and normally I'd agree, if the recipe is really involved and uses ingredients you aren't familiar with. But as I learned Monday, sometime recipes you've never made before turn out to be the ones you add to your Easy Entertaining pocketbook.

Chicken with Alfredo and Vegetable Pasta (I know, not a very creative name - send me new suggestions)

For the Chicken


1 mixed bag of chicken: breast, thighs, legs - I take off most of the fat
salt, pepper, garlic powder
olive oil

Cover a baking sheet with aluminum foil and arrange the chicken on it. Cover evenly with oil, then spice both sides, rubbing everything into the skin and little crevices.

Bake in a 350 degree oven for 25-30 minutes or until the juices run clear.

Take out of the over and cover with another sheet of aluminium foil and let rest 10 minutes before serving.

For the Pasta
Make the Veggies:


1 bell pepper, sliced thinly and cut into 1 inch pieces
1/2 large onion, chopped
3 scallions chopped, plus another chopped finely and set aside for garnish
3 cloves garlic, chopped
salt, pepper
8-10 slices sundried tomatoes, cut into strips
In a saute pan, brown the onion and garlic. Add the bell pepper and when this is soft, add the scallions and cook until the scallions are just soft enough to mellow out their onion-y flavor (you don't want them turning brown). Then, add the sundried tomatoes and at the very end, a few more pieces of fresh scallion.


Make the Sauce:

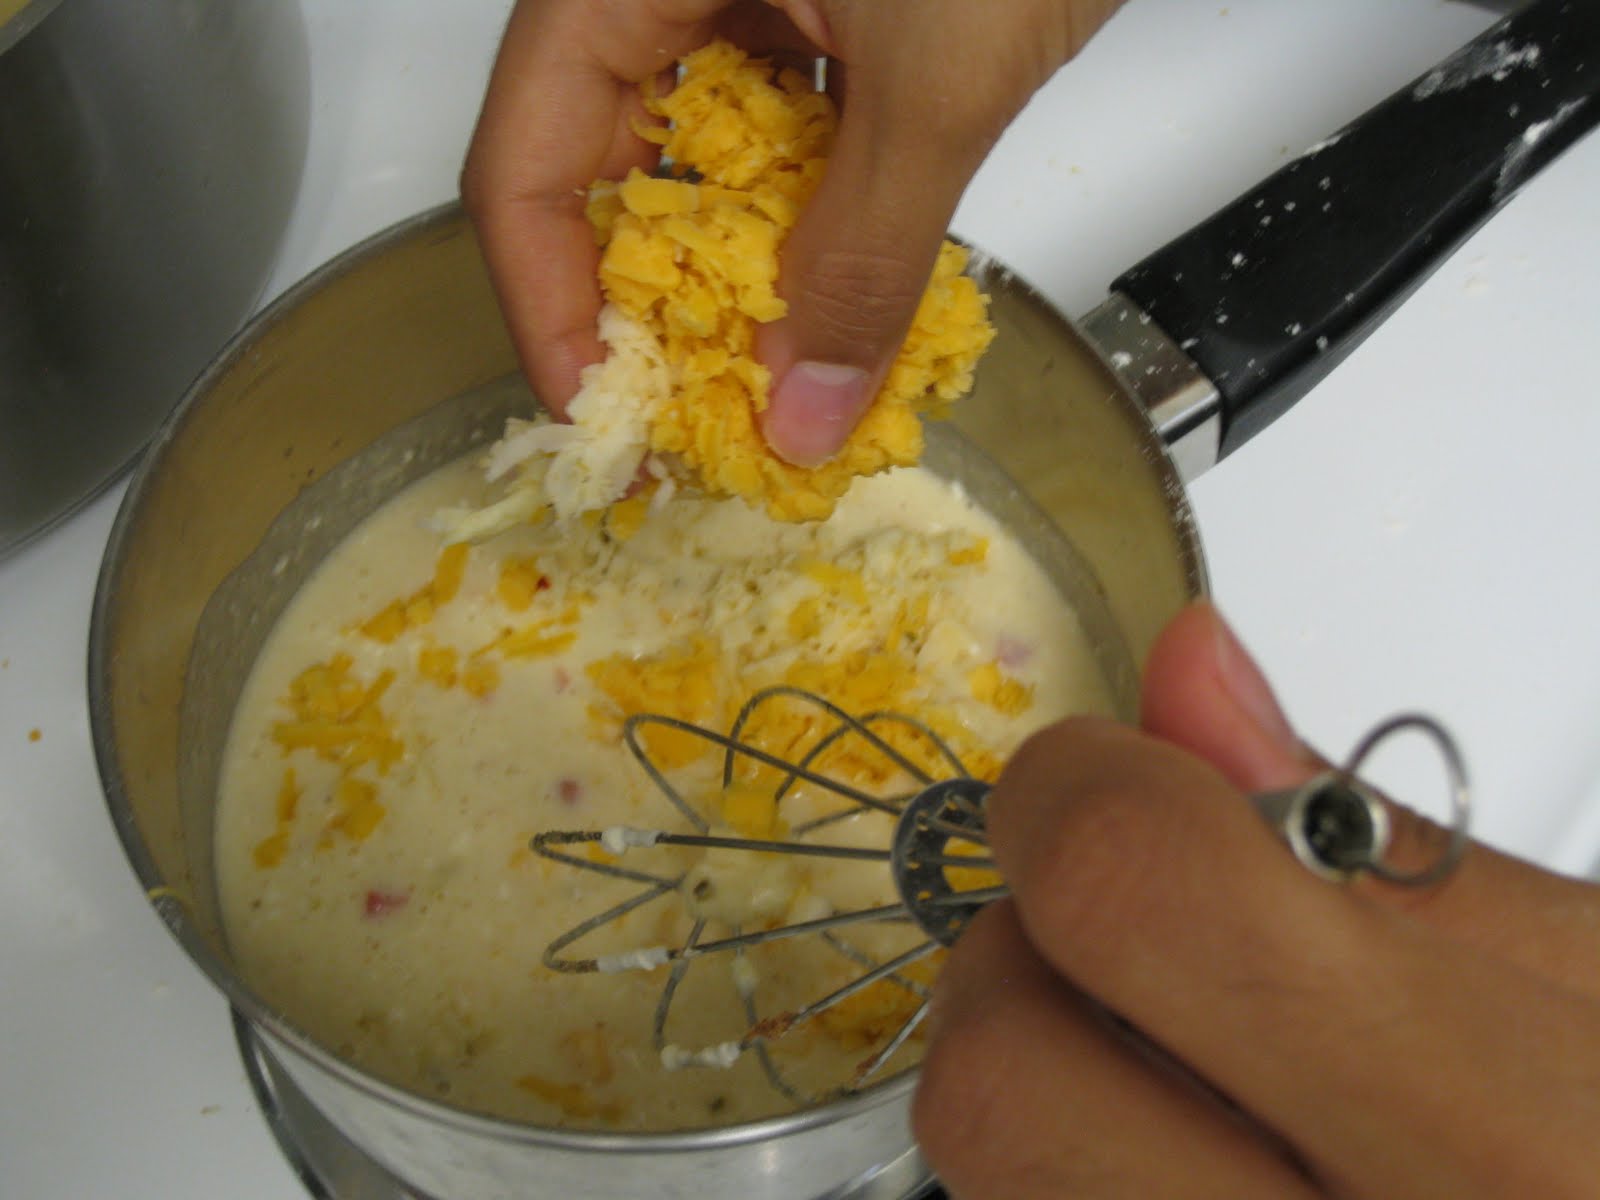
1/2 cup pecorino cheese, grated
3 Tbs cream cheese
4 Tbs flour
3 Tbs butter
1 c milk
salt, pepper, garlic powder

Make a rue by melting the butter then adding the flour and cooking the two with a whisk for about 20 seconds. This takes away any gritty flavor of the flour. Over medium-high heat, add the milk and whisk like your life depends on it. This won't thicken up immediately, but it will so be patient. Add the cream cheese, spices, and pecorino and watch as it all comes together. Turn off the heat, cover with a lid, and let sit till your pasta has cooked.


Make the Compote:


1 package baby tomatoes, sliced into quarters
2 Tbs good olive oil
salt, pepper
1 Tbs balsamic vinegar
Throw in 4 leaves of basil, chopped, if you have any

Mix all together and let sit until ready to serve

Make the Pasta:
I use about 3/4 package of spaghetti pasta

Cook it and reserve a little pasta water in case everything is too thick when you're combining the parts.

Finish it up:

Add the veggies to the pasta, then mix in the Alfredo and toss to coat. I drizzle in a little olive oil in addition to the pasta water because it is a little thick as-in. Put on a plate and garnish with the reserved scallions and a sprinkling of red pepper flakes. After guests have served themselves, have them put a little of the Tomato Compote over their pasta - it gives an amazing bite to the dish.
Tips from the Chef:
  • Whenever you are using olive oil, know these things: a fruity, flavorful olive oil is good for anything you will taste directly (for instance, salad leaves) while an extra virgin olive oil is useful for sauteing.
  • I like using red of yellow bell pepper for cooking, I just think the flavor is sweeter and less harsh than the green variety
  • Pair this dish with a wonderful red or white wine
  • There is no shame in accepting help. I grew up with a Persian mother who refused to let anyone (excluding family members) bring a dish with them when they came over. I think there's no problem with letting people be a part of the meal, especially if they have a special dish they want to share. Another plus is that by participating in the meal, people are more likely to feel more comfortable eating YOUR meal. Our guest, Kelly, brought an amazing salad and kindly shared the recipe with me, so look forward to seeing that in the near future!

Sunday, July 25, 2010

Yummy Carrot Soup

When I was a little girl, my favorite book was called "The Tawny Scrawny Lion." Short story shorter, there was a lion who didn't eat anything and was way too skinny, so to fatten him up a family of bunnies made him some carrot soup. I thought carrot soup was a myth until I discovered this recipe. It's so simple, you won't believe it tastes so good!

What you need:

4 Tbs butter
12 carrots, sliced
2 onions, sliced
1/2 tsp salt
1/2 tsp pepper
pinch of thyme
8 cups vegetable or chicken broth
1/2 c rice
splash of cooking sherry


What You Do

Melt butter in a large pot and add the carrots and onions. Simmer for 10 minutes with the lid on.
Add the broth, thyme, salt, and pepper. Bring to a simmer.
Add rice and sherry. Simmer on medium heat for 35 minutes.
In a blender, add 1 ladle-full of the soup mixture and puree until it is the consistency you like - I am a fan of a very smooth, creamy texture.

Gobble it all up on a rainy day :)


Friday, July 23, 2010

The Cuisine of the Petoskey Area


When I started this blog, I planned to write abut my own food, and the food I discover on my travels. But...I am a poor college kid with a full-time summer job, so there aren't many "trips" except ones to my home 20 minutes away.

Happily, as part of my internship program, I was able to go Up North for the first time EVER this week and I was absolutely blown away by the amazing food I was served. The flavor combinations played so well off each other and I am incredibly excited to share my findings with you!
1) Morels - Are the jewel of Up North - they pair well with a nice, local red-wine and as part of a cream sauce served over beef.

2) Cherries - It's common knowledge that we Michiganians are famous for this tree fruit. Eat them fresh for ultimate enjoyment, or throw a few dried cherries into your next batch of oatmeal or chocolate chip cookies.

3) Fresh Produce - Is meant to be eaten as-is; don't dress it up in a pie or chopped into a crazy salsa. Instead, add ingredients that bring out the natural flavors and enjoy them simply. For example, strawberries drizzled with a little balsamic makes for an amazing breakfast.

4) Walleye and Whitefish - Both, when in-season, are light and flaky and taste non-fishy, a true sign of their exceptional quality.

5) Moomers Ice Cream - Unbeknowst to me, this is a local Traverse City favorite. I was given the opportunity to try some and it was all it was rumored to be - flavorful and custard-creamy. Their newest flavor is called "Yum." In the words of Ina Garten, "Now, how bad can that be?"


This week I witnessed the true beauty of Michigan. I can see now why hoards of Michiganians flock Up North once summer arrives. The breeze off the water, the locals who never rush you for decisions, the calming sound of tree leaves tinkling, all make for a most relaxing getaway. I am truly grateful for the experience to enjoy this area and meet the lovely people who live there.

Sunday, July 18, 2010

Pasta Party!


The best way to eat food is to share what you make with friends. Today two of my dearest friends came over for a casual dinner of pasta, Chilean wine, and rum balls.


In my opinion, everyone needs a fool-proof pasta recipe they can tweak and change according to what's on hand. Here's mine:


What you need:

1 box whole wheat pasta
4 peddadew peppers
7-8 slices of sun-dried tomatoes, chopped coarsely
3 large green olives, sliced
4 large black olives, sliced
2-3 cloves garlic, chopped
1 Tbs capers
juice of 1/2 half lemon
3 inches pepperoni, in thick julienned pieces
salt, pepper, garlic powder, red pepper flakes
2 Tbs fruity, salad olive oil
1/3 c baby tomatoes
Dijon mustard
3 oz Havarti cheese, cubed
(if I had time, I would have also added 1/2 a sauteed onion)


What To Do

Cook the pasta in the way described in a previous post (boiling, salted water with a splash of olive oil) and cook until al dente.

In the meantime, heat some oil in a saute pan and add 2 cloves of garlic. Add all the other ingredients, lastly being the salt and pepper.

Add this mixture to the pasta, then mix in the olive oil and about 1/3 cup sliced, fresh cherry tomatoes. You could add some cut basil here, too.

Finally, add the cubed Havarti. Havarti is a fast melting cheese, so this will probably start melding into the pasta quickly. Squeeze in the mustard (1 or 2 squirts), lemon, add the red pepper flakes, and taste for seasoning.

Finally, dust with a cover of pecorino cheese.


Tips from the Chef

Adding the following things can really make a pasta dish pop:
fresh herbs (basil, for example)
lemon juice and lemon zest
Dijon mustard
red pepper flakes
feta or goat cheese

Luckily, the other little ingredients really pack a punch and I just love them in any dish.


Thanks to my amazing friends who came over to spend a Sunday evening together.


I will miss you so much next year!


Tuesday, July 13, 2010

Simple Snacking: Caramel Corn


This is a recipe for all the friends and boyfriends who watch their cook/bake - ing friends and think, "That looks wayyyy too complicated."


The other day, while I went for a late-night workout I returned home to the most amazing aroma of butter and sugar. That could only mean one thing: caramel sauce. But I hadn't made any so who could be the producer of such a wonderful concoction? That's right, y'all - my BF, Weston :) Honey, I am so proud of you! See, you CAN cook!!!

The recipe he used was taken from a website, but we suggest throwing some peanuts or pecans in before putting it in the oven. Then when it comes out and has cooled, add chocolate chips or butterscotch chips, or toffee bits, or M&Ms...you get the picture. But it is truly divine as-is.

In case you don't want to click over to the recipe, here it is!

Weston also added a pinch of nutmeg and cinnamon - good call on his part because these two spices really make a dish so warm and comforting.

Saturday, July 10, 2010

A Weekend At Home

Since I will soon be leaving the great state of Meeeechigan (and I'm not being sarcastic; I think Michigan isn't really as bad as people like to say), I decided to go home for the weekend and spend some time with the fam. My mom was so excited she planned a cooking/baking extravaganza and I am currently sprawled out on the couch trying to digest all the delicious meals we made. Maman, I am happy you've started to enjoy cooking again.

This Coconut Cake was probably the crowning masterpiece of my weekend.

The recipe was taken from here.

I have to say, it does have a bit too much sugar for my taste, so I usually cut down on each amount by about half a cup. Another thing I'd like to add is the frosting recipe makes A LOT of frosting, so I use 2 egg whites and cut all the other ingredients in half as well.

Enjoy the following picture documentary of our baking adventure.
First, we made the cake - which had an extremely moist and tender crumb - and happily, some crumbs stuck to the pan when we flipped it over, so I was able to perform a little quality control before sampling a slice. Oh, and I substituted coconut milk to add a little extra flavor.

Next I made the coconut filling - ooey gooey deliciousness

And here are the two layers kissing :)

Now the meringue frosting, beaten to stiff peaks. This frosting is so wonderful - it really tastes like a cloud in your mouth. And remember, all this frosting came from only 2 egg whites!

Finally, I toasted some extra coconut to bring out it's nutty flavor

Then iced the cake with the frosting...

...and sprinkled over the toasted coconut for garnish (see picture above)

Ok, I promise, there will be more meal ideas later this week!

Wednesday, July 7, 2010

Homemade Comfort Food: Mac & Cheese 2 Ways


Macaroni and Cheese from scratch used to scare me. Maybe it was the huge amounts of high-cal cheese, maybe the bechamel sauce, maybe...oh, who knows? The point is, thanks to some gentle prodding by a friend, I faced my fears and am now happy as a clam pulling out the butter and flour and mixin' up a tasty batch of homemade comfort food.

First you need a white sauce:

This can be made easily by melting about 3 tablespoons of butter in a saucepan. Add a couple tablespoons of flour and whisk until the mixture looks like this:


Next, add about 1 1/2 cups of milk and whisk until the mixture starts to thicken. Add 1 or 2 tablespoons of cream cheese, a long squirt of Dijon mustard, 1/2 tsp nutmeg, and a sprinkling of pepper, salt, and garlic powder (I went a little heavy on the GP). If the mixture hasn't thickened up by now, you can add a teaspoon of cornstarch.

Now, the cheese! You can use any mix you like: I used Havarti, cheddar, and pepper jack - about 3/4 cup of each. Havarti is a good melting cheese, pepper jack adds a kick, and cheddar is, well, delicious. I like Seaside English cheddar, but today I used an extra sharp New York kind.
Hint: go to Trader Joe and scope out what's on sale. They usually have really good deals on really good cheese.

Take the mixture off the heat and add the cheese, stirring well to incorporate.

After you've added all the cheese, taste to be sure it's seasoned the way you want. I added a bit of Tabasco for heat - cream sauce can handle a lot of heat, so don't be scared. Drain your pasta and add the cheese sauce to it. I like using gemelli pasta - it's less swirly than fusilli, so it can hold to the thick sauce without breaking into pieces.

Now, you can eat it just like this - that's how I like it - or you can turn it into the baked version by doing the following:

Cut 3 tomatoes into 1/2 inch slices, cover with olive oil, salt, and pepper, and place on an aluminum lined baking pan. Bake at 400 degree for 1/2 hour or until the water has cooked out of them. Spread the mac & cheese mixture (above) in a Pyrex dish and top with a mixture of seasoned Italian breadcrumbs, 1/2 cup cheddar cheese, and 1/4 cup pecorino. Then place the tomatoes on top and bake again until the top is golden brown. Serve immediately and eat up!

Saturday, July 3, 2010

A History of Cheesecake

My earliest memories of cheesecake go back to before my youngest aunt was married. It was well known in our family that whenever we had a get-together, she could make her famous cheesecake - and nothing else ;) But over the years, my Aunt actually became a very good cook, and a health nut to boot, so it's been a while since I've sampled one of her full-fat wonders. Auntie, if you read this, can you make one of those cheesecakes again? I miss them.

Without my aunt to guide me in the cheesecake-making process, I watched my mother as she embraced the revelation of the 90s - use ricotta! This is how I created my current recipe for cheesecake, using a compilation of mom's recipe, a friend's suggestion, and my own noggin' - let me know what you think :)

Just so y'all know, this was not a planned baking shindig. Three days ago cream cheese was on sale so we bought 2 packages. One week ago, my mom brought over 5 limes. A week ago, my friends and I had a baking night, and we had a couple tablespoons of butter left over. Couple with a little ricotta, some eggs, and a few other things that are always around the apartment, and you have a refreshing July 4th dessert sure to please anyone!
I had the idea to make a key lime cheesecake because, basically, I was too lazy to make a custard for a key lime pie. And because I had all the above schtuff. Here's what you do - couldn't be easier.
Gather Your Tasties:
  • 2 packages 1/3 fat cream cheese
  • 1/3 c cornstarch
  • 3 eggs
  • 1 1/4 cups granulated sugar
  • 1/2 cup lime juice, or 3 limes juiced
  • zest of 2 limes
  • 8 oz ricotta cheese
  • 1 tsp vanilla
  • 2 cups Nilla wafers
  • 3 Tbs butter
  • Tad cinnamon

Make the Crust

  • Melt the butter
  • Crush the wafers
  • Mix the two, then add a dash of cinnamon

Press this mixture into the bottom of a cheesecake pan. I usually just do a bottom crust and don't press the crumbs up the side of the pan. My mom taught me this - partially because it cuts down on calories, partially because my mom doesn't particularly like crust. I, for one, LOVE crust - so I put it up the sides.

Bake this at 375 degrees for about 10 minutes until it's a golden brown color. Let this cool while you make the filling.

Make the Tasty Filling

The crucial step here is that the cream cheese be room temperature when you mix this, otherwise you get those dreaded chunks of cream cheese speckled throughout the mixture. I have come to terms with my personal downfall of impatience, so I just shove the cream cheese in the microwave and nuke it. 30 seconds usually does the trick.


              • Mix the cream cheese and ricotta, then the sugar
              • Add the vanilla and eggs
              • Add the cornstarch
              • Pour in the lime juice and zest

              Pour the filling into the crust and set on a baking sheet so if there IS a crack in your crust, the filling doesn't ooze out onto the floor of your oven. Bake this at 325 degrees for 1 hour and 10 minutes. Turn off the oven and crack the oven door - let the cheesecake stand in the open-doored oven for another hour before setting it in the fridge overnight.

              Tips from the Chef


              Use 1/3 fat cream cheese. This is kinda crucial because you aren't going to miss the fat if you aren't looking for it. However, if you use the NONfat cream cheese, just don't bother making this recipe because this particular type of cream cheese is narsty! Like, almost sour tasting. Please, please, don't use it.

              A lot of people say that if your cheesecake cracks on top, it's a sign you did something wrong. To avoide this, you can use a bain-marie and more like steam/bake the cheesecake. But I like the cracks - it proves you made something from scratch. And it gives you an excuse to do the following:

              Sour Cream Topping

              Mix 1/3 cup to 1 cup sour cream with about 3-4 Tbs milk, 1 Tbs lime juice, and 1 Tbs confx sugar and pour over the top of your crackly-topped cheesecake.

              But for my cheesecake, I arranged lime slices over the top, sprinkled them with a little sugar, and set a torch to them to caramelize. Then I piped whipped cream around the outside.


              Enjoy all :)

              ~Sheila